Animation Expressions
Overview
Blockbench supports math expressions in several places in the animation workflow. Expressions can be used for various tasks, from driving values with math expressions to create animations along sine curves, over dynamically reacting values, to modifying the state and transformation of a model via variables.
Expressions use a C-like syntax that is based on the Molang language that is used for animations in Minecraft. This means that the same expressions can be used both for animations inside Blockbench for various purposes, for general 3D exports, and for exporting to Minecraft Bedrock Edition.
Syntax summary
- Expressions support a C-like syntax. Any expression returns a numeric value.
- Some syntax requires boolean values, in such cases a value of 0 will be considered false, any other value will be considered true.
- All trigonometry functions use degrees to describe angles.
- Expressions are not case sensitive, line breaks and most white spaces are ignored.
Here is the most important syntax in a few short examples:
Add, multiply, subtract, divide
5 * 7 + 49 / (4+3)
Math expressions
Math.sin( time * 400 ) * 12
Assigning variables
v.my_value = 20;
Using variables
20 * v.my_value
Ternary operators
Ternary operators consist of a pattern of three values, divided by a question mark and a colon. The first value is evaluated first. If it is true or has a value, the second value is returned. Otherwise, the third value is returned.
v.is_enabled ? 20 : 10
Common variables
These variables are commonly used when working with expressions in animations.
| Variable | Description | Supported in Minecraft Bedrock |
|---|---|---|
time | Returns the current time within the animation in seconds | No |
q.anim_time | Returns the current time within the animation in seconds | Yes |
q.delta_time | Returns the delta time since the last rendered frame | Yes |
Math.PI | The value of the number Pi | Yes |
q.distance_from_camera | The distance between the camera and the center of the scene | Yes |
Blockbench will provide autocomplete options for most syntax.
A full overview of the syntax of Molang can be found here: Molang Syntax Guide
Additional Blockbench-only features and syntax will be explained in this article.
Exporting expressions
Common 3D export formats such as glTF and FBX do not support expressions in animations, they are limited to keyframes. Due to this, expressions will be baked down into keyframes when exporting to such formats. This limits expressions to things like sine curve driven animations and similar approaches. Use-cases such as variable-driven model state are not possible with these formats.
Advanced animation expressions can best be used when previewing animations directly in Blockbench or recording them into GIFs or videos.
Additionally, export to Minecraft Bedrock Edition (and Java Edition via Geckolib) fully supports expressions.
How to use expressions
Expressions can be used in various places within an animation. If a field for numeric values allows you to type in non-numeric expressions, that is usually a sign that expressions are supported. Expression input fields will highlight syntax in different colors and provide autocomplete.
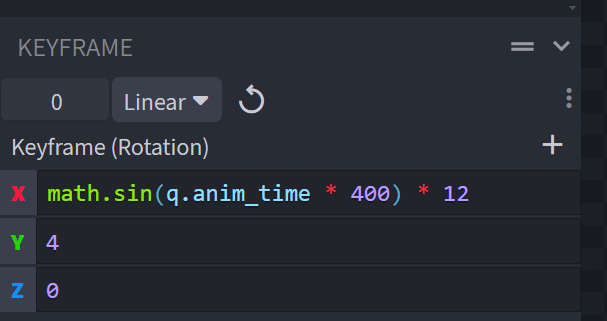
Keyframes
Keyframe values can be either numeric values or expressions. If only one keyframe exist, the entire channel will be animated based on the expressions of the keyframe. Otherwise, expressions will be evaluated at the current time in the timeline and then interpolated between just like linear numeric keyframes.
Keyframe expressions generally don't work in keyframes with smooth or bézier interpolation.
To enter an expression into a keyframe, create or select a keyframe. Then write your expression into the input of the respective axis in your keyframe field.
Anim Time Update
Right click an animation and click Properties... and you will see a dialog with animation properties. Some of these support expressions.
Anim Time Update is an expression that controls how fast the animation moves along. The expression is evaluated any time an animation frame is rendered.
By default, if the field is empty, the expression would look like this:
query.anim_time + query.delta_time
query.anim_time refers to the current time in the animation. query.delta_time is the real time that has passed since the last frame was rendered. This expression ensures that the animation progresses each time it is rendered by exactly how much time has passed, ensuring consistent playback speed even if some frames take longer to render.
A simple way to modify this is to put in query.anim_time + query.delta_time * 2. This doubles the delta time, resulting in an animation playing at twice the speed.
Or put in query.anim_time + query.delta_time * (1 + 0.6 * math.sin(query.anim_time * 500)) to modulate the playback speed.
Blend Weight
In the same dialog, you can enter an expression for blend weight. Blend weight lets you multiply the amplitude of the entire animation by a factor. Entering 0.5 will make the animation play only half as much, entering 2 will double the effect.
As usual, complex expressions are supported to achieve certain effects.
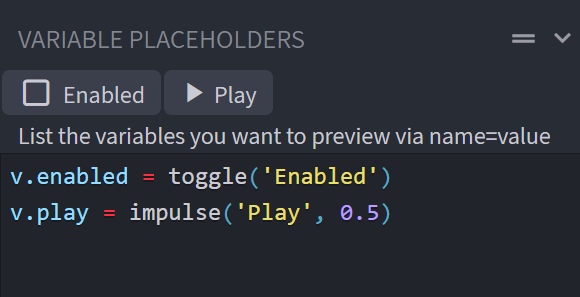
Placeholders
The Variable Placeholders panel allows you to run arbitrary expressions without those directly affecting the animation. This is particularly useful for defining values for variables, allowing you to preview the model in particular states.
You can simply define variables like this:
variable.foo = 25;
v.bar = 5 + 5;
Additionally, you can use UI inputs, as explained in the following section.
Placeholder UI Inputs
You can use special syntax to add UI inputs that provide an easier way to change values:
v.enabled = toggle('Enabled')
The following types of inputs are available:
toggle(name)
Adds a checkbox. Returns 1 when enabled and 0 when disabled
- Name: Display name of the element, should be written in single quotes (
')
slider(name, step, min, max)
Adds a numeric slider input that users can slide or enter a number into.
- Name: Display name of the element, should be written in single quotes (
') - Step: Set a value by which the value is incremented when using the slider. Optional and defaults to 1.
- Min: Set a minimum value. Optional.
- Max: Set a maximum value. Optional.
impulse(name, duration)
Adds a button. When pressed, this will return 1 for a short while, then return 0 again.
- Name: Display name of the element, should be written in single quotes (
') - Duration: Set how long the impulse will last in seconds. Optional and defaults to 0.1.
Use cases
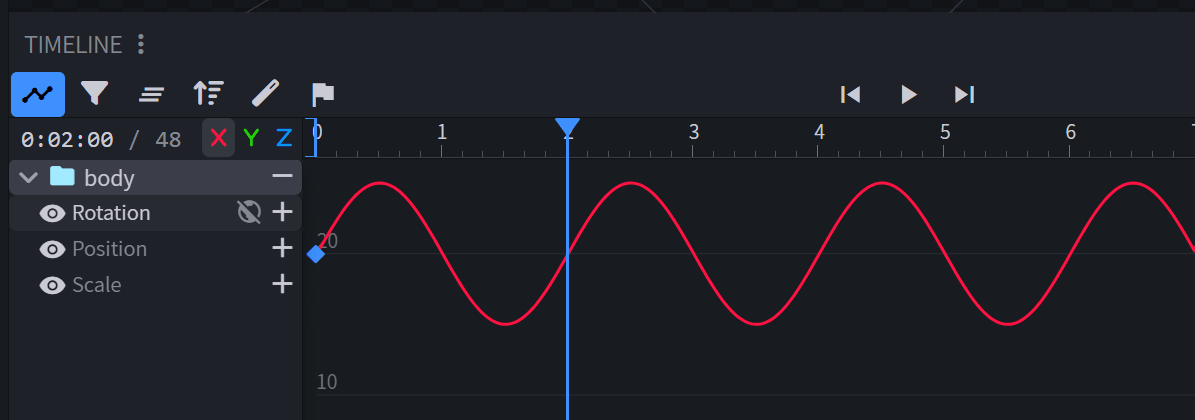
Animating with Sine Curves
There are a lot of use-cases for sine curves when creating animations. Sine curves can create a smooth back and forth movement. Depending on the frequency and amplitude, this can be used for anything from breathing, over walk cycle animations, to high frequency movement like vibration or shivering.
A basic sine curve looks like this:
20 + Math.sin(q.anim_time * 180) * 5
20 is the base value here, before adding the curve. 180 is the frequency of the curve, in this case the curve will complete 180 degrees or half a cycle per second. 5 is the magnitude of the curve.
With this expression, the value will smoothly swing between 15 and 25 every two seconds.
In addition to the Blockbench preview, you can use the Graph Editor to preview sine curves. The Graph Editor can be opened by clicking the Toggle Graph Editor button in the top left corner of the timeline.
Baking
Besides letting the exporter take care of baking, you can also bake an expression into static keyframes while working on the animation in Blockbench. Baking, in this case, just means converting the one math expression into lots of individual keyframes with static numbers that represent the curve.
To bake a set of keyframes, follow these steps:
- Install the Bakery plugin
- Ensure the sections you want to bake have a start and end keyframe. For simple curves, simply copy the start keyframe and paste it at the end.
- Select all keyframes that you want to bake.
- In the Menu bar, click Animation > Bake Animations
- Adjust the parameters
- Rate: Set the interval of generated keyframes. At 1, every snapping interval will get a keyframe, but you can increase the value to lower the amount of keyframes generated, lowering both the accuracy of the curve, but also the amount of data being generated.
- Spherical Interpolation: Enables quaternion interpolation between rotation keyframes, ensuring rotation lerping takes the shortest path. This is not generally supported in combination with expressions.
Face Rig
You can use expressions and variables to set up complex rigs and switch parts based on variables. A good example for that is a face rig, where you can have multiple mouth shapes, different variants for your eyes, and switch between then to create unique expressions.
Here is a video tutorial explaining this method: Rigging Faces in Blockbench (using Variables) - YouTube
Note about the video: No keyframe is needed on the mouth parent group.
Model Setup
First, choose a part of your face that you want to animate. Let's take the mouth. Create a new group called mouth for everything related to the mouth. Inside it, create a group called mouth_1, and inside that, add a cube or mesh which contains your first mouth shape. In the most simple example, this could be an empty plane that you draw a mouth on. But you can also do something more complex and use multiple elements.
Now, duplicate mouth_1 to create mouth_2, which should be a different mouth shape. Create as many mouth shapes as you need.

Animation Setup
Now, switch to Animate mode and create an animation. Create a scale keyframe on the mouth_1 bone with the following expression:
v.mouth_shape == 1
This will compare the variable mouth_shape to the number 1. If the variable is in deed 1, it will return 1, which leaves the bone at the original scale. Otherwise, it will return 0, which will scale down the bone and effectively hide it.
Repeat this step for all other mouth variants, so that mouth_2 is only displayed when the variable is 2, etc.
You can now add a slider to control the mouth manually. Refer to the Placeholders section for more details. In this case, we will add a slider called "Mouth" that will let us control the value of the variable in steps of 1, and in a range between 1 and 3:
v.mouth_shape = slider('Mouth', 1, 1, 3)

You can repeat the previous steps for as many details in your rig as you like, including eyes, eye brows, nose, etc.
Use the rig in animations
The final step is to keyframe the value of the variable. You can either do this in the same animation, or create a new animation for this, and keep both playing.
Click the "Animate Effects" button at the top of the timeline to open the effects animator, then create a keyframe under "Instructions". Instructions keyframes allow us to run expressions at certain times in the animation.
In the keyframe panel, set the Script field to a script that changes the variables. You can also use multiple lines, separated by a semicolon, to set multiple variables at once:
v.mouth_shape = 2;
v.eye_right_shape = 1;
v.eye_left_shape = 8;
You can now create multiple of these instruction keyframes at different times during your animation. That way you can animate dynamic facial expressions that change during the animation, for example to let your character blink, talk, or display emotions.
Speed Ramping
As mentioned above, animation playback speed can be modified in real time via expressions. This can be used to create speed ramping effects.
Please note that this does not carry over to traditional export formats such as glTF, even with baking.
In this example, let's assume we have a 4 second long timeline. Between the 1 second and 1.3 second mark, the action happens, and we want to slow down the animation and play this part in slow-motion.
First, let's write an expression that can detect that time range. We will use q.anim_time, which is an expression that returns the current timeline time.
q.anim_time > 1 && q.anim_time < 1.3
Now, we want to return the value 0.2 during that time range to slow down the animation to 20% speed. The rest of the time, we will return 1 which represents normal speed.
(q.anim_time > 1 && q.anim_time < 1.3) ? 0.2 : 1
We'll plug this into the default anim time update variable as a speed factor. Keeping in mind to wrap the expression in parantheses to maintain the correct order of operations. We end up with this:
q.anim_time + q.delta_time * ((q.anim_time > 1 && q.anim_time < 1.3) ? 0.2 : 1)
When entering this expression into the Anim Time Update field in your animation's properties, you will get the desired speed ramping effect.
Expressions in Numeric Inputs
Besides animations, expressions can also be used in almost any numeric input inside Blockbench, where it will resolve instantly upon confirming the input.
Examples where it can be used include:
- Element position and rotation number sliders
- UV position sliders
- Numeric inputs for setting texture or UV size
- Numeric inputs in any dialogs and in settings
- Sliders such as brush size
This can be used for some interesting use-cases, such as procedurally processing and modifying position values of elements.
Special rules for Number Sliders
Sliders often control many elements at once, therefore they use special rules to allow running the expression on each element individually:
- Beginning an expression with the sign
+,*, or/will add to, multiply, or divide the current value of each element individually. Since-is already reserved for entering negative values, you can instead use+-to subtract a value. - Using
valin an expression will return the previous value of the field for each element - Using
nwill return the index of the element in the list of all processed elements. The order may be arbitrary or depend on the order of selection.
When selecting multiple elements, the expression is evaluated per element. When in vertex selection mode, position inputs are evaluated per vertex. UV inputs are evaluated per face.
Use-cases
The practical use-cases are infinite, which is a number too big to include in an article. However, here are some examples:
| Expression | Description |
|---|---|
16*4 | Returns 64 |
*2 | Double all values |
+-Math.PI | Subtract PI from all values |
Math.random(0, 8) | Randomize the position value of all selected elements to a value between 0 and 8 |
val < 0 ? 0 : val*2 | Set all negative values to 0, double all positive values |