3D Export
Introduction
You have created a model in Blockbench, and now you want to use it outside of the program? Blockbench comes with several 3D export formats that are compatible with external apps. So whether you want to create a render of your model, use it in your own Unity, Unreal, or Godot game, or even 3D print it, chances are there is a format for you!
All export formats are available from the menu under File > Export. But there are differences between the formats. Each one has its unique advantages and disadvantages, so you will need to find the format that works best for your use-case.
This article will go over the common export formats, help you find the right one for you, and also explain how you can import your models into some common programs.
For guides on how to export your models to specialized formats, such as 3D models for individual games like Minecraft, check out the Quickstart Guide instead.
Recommended Formats by Use-Case
There is usually an ideal format for each application:
| Blender (for modeling) | DAE |
| Blender (for rendering) | glTF |
| Unity game | FBX, DAE |
| Unreal Engine game | FBX |
| Godot game | glTF |
| Sketchfab | glTF (File > Export > Upload to Sketchfab) |
3D Formats
OBJ
OBJ might be the most widely supported 3D model format. However, as much as it is supported, it is also extremely limited. If you are looking for any kind of hierarchy or animation support, this is not the format for you.
Advantages
- Almost unanimous support
- Simple to manually edit
Disadvantages
- No hierarchy
- No animations
- Limited material options
glTF / glb
glTF, or its binary-encoded counterpart glb, is a modern and widely adopted standard for 3D export. However, as great as it works for 3D export, there are some disadvantages when using it to exchange files between different 3D editors.
Advantages
- Wide support
- Great support for hierarchy and animations
- Good support for materials, including pixel-perfect filtering
- Embedded textures
Disadvantages
- Not optimized for further editing. Quads get converted into tris, vertices are no longer shared between different faces
- No native support in Unreal Engine and Unity.
FBX
FBX is a proprietary 3D format by Autodesk. It is widely used for 3D games and movies. However the closed-source nature of the format makes it difficult to support for open-source applications.
Advantages
- Support in Unity and Unreal Engine
- Support for all important features
- Embedded textures
Disadvantages
- Not compatible with Blender, since Blender can only import binary FBX and Blockbench can only export ASCII FBX
DAE (Collada)
Collada is an open-source 3D format that is intended for exchanging files between different 3D programs. It supports hierarchy and animations.
Advantages
- Support for all important features
- Compatible with Blender, Unity, and many other programs
Disadvantages
- More limited material options when compared to glTF
Import Guides
After exporting, getting the model into your target application is usually trivial. But it might need a few tweaks to render correctly. Unless you are using glTF with a compatible program, chances are your texture will look completely blurry, and transparency may not work. Here is a guide for how to fix this in some of the most common applications.
Blender
- Import your model via File > Import
- Switch to the Material Preview option using the Viewport Shading option in the top right of the viewport, so that you can see your texture
- Make sure your object is selected and switch to the Material Properties tab in the properties panel in the bottom right of the screen.
- Under Surface, press the Arrow button next to Base Color to unfold the options, and set the second option from Linear to Closest.
- Scroll down and set Roughness all the way to 1.000
- Scroll down to Settings and set Blend Mode to Alpha Clip. Or, if your texture has translucent (half transparent) parts, set it to Alpha Blend.
- Here you can also enable or disable Backface Culling based on your preference. If enabled, you won’t be able to see the backside of your faces.
Unity
- Drag and drop your model into your preferred folder in the Unity file browser.
- When loaded from some file types, all the geometry, materials, and textures are baked into one prefab, so you can't change them. To fix this, locate and expand the model in your project browser. Right click the texture and click Extract From Prefab. Do this for all your textures and materials.
- Next, select the material and set the Rendering Mode to Cutout
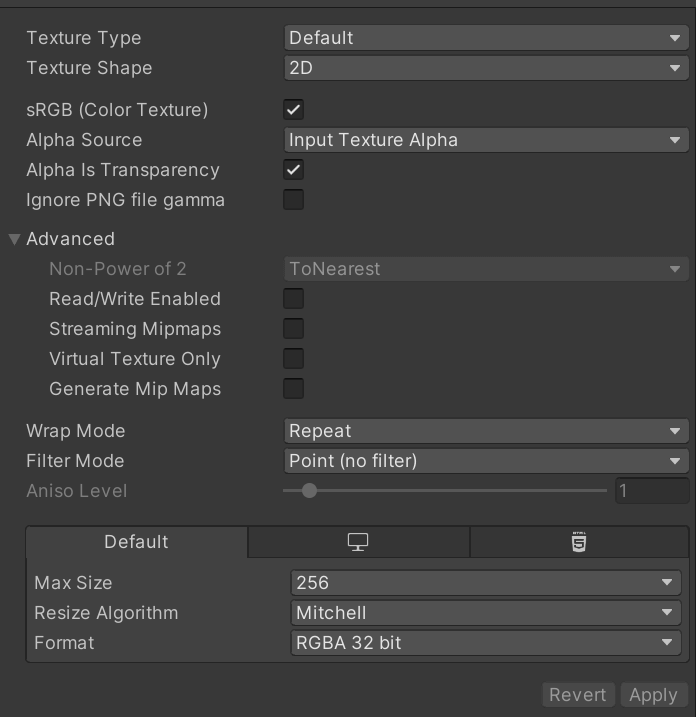
- Now, select the texture, set Filter Mode to Point (no filter) and at the bottom set Format to RGBA 32 bit.
- Don't forget to press Apply!
